Showing posts with label make up. Show all posts

Wednesday, May 9, 2018

Poshmark


Hello all!


Yes, I have been gone for quite a while but I am still alive and kicking! I will, in future posts, explain what has kept me away but for today we are talking about one of the many tricks that I have found to have nice things and get them for cheap! That's right, money saving tips!


If there is one thing that my family knows about me it is that I am good at finding expensive things for a cheaper price. Or taking something old and making it look new again, but more about this later as well! I am just so good at it that I think everyone should know my tips and tricks so this will be a series of blogs! And today we start with a website/app called Poshmark! Now just to clear the air, I am not sponsored by or influenced by Poshmark in anyway, shape or form! Now that that is out of the way, here we go!


Poshmark is an app/website that you can buy and sell used or new items, sort of like an online thrift store. You can find items anywhere from home decor to makeup to skincare to clothing and shoes. You can choose to buy with money from a bank account or credit card or, my personal preference, you can sell items on the site and you get basically like store credit to purchase other things on the site with. You can choose to request a check for the amount that you sold items for as well.


Tips for selling items successfully:


  1. Be truthful about the condition of your items! If you live in a home where smokers are, don't say that it comes from a smoke free home. The buyer might be allergic to smoke. And if you have dogs or cats, make sure to list in the description so. The nice way to do it would be to say "Comes from a pet friendly home". And always explain what condition the item is in such as using terms like: "Some wear and tear", "Has a rip", "Tag is missing", etc.
  2. Accurately state the size/color/shade of your items! I had experienced this exact situation myself. Everyone that wears makeup knows that you don't buy a foundation that isn't your shade if you can help it. I am the lightest of the light in shade and I asked someone what the shade of an item was (because she didn't list it in her listing) and she said it was the lightest shade and it in fact was not. If this does happen to you, Poshmark has an ability for you to return the item if it is not as described and get your money back.
  3. Packaging goes a long way!Even if it is a bottle of shampoo, wrap it in something. I at least wrap everything in tissue paper. If it's makeup then wrap it extra good, or if it is breakable! Some people go as far as to wrap the items like a present with a bow and all. And the notes people leave as awesome. It can be something as simple as a sticky note saying thank you, or a thank you card with a hand written message. It's like you bought yourself a present!
  4. Ship items on time!When your item sells, Poshmark automatically sends you a shipping label. Ship your items out in a timely manner! If someone doesn't ship the item in 7 days it does give you the option to cancel the order, which I have done several times. But the faster you ship, the more people will want to come back to buy from you again!

Tips for buying items successfully:


  1. "Like" items and watch them!When you find an item that you like but aren't happy with the price you have a few options here. You can "like" the item and it will go into a sort of "wish list" and when/if the seller ever lowers the price it will notify you. Then you can snatch that item up at a bargain!
    or
  2. Offer the seller a lower price!When you find an item you like there will be a button at the bottom that says "Offer". You can offer the seller a lower price for an item. Not all sellers will accept an offer but if it is an item that has been in their store a long time or they just want to get rid of it, then they may accept the offer!
    or
  3. Bundling!Bundling is a great option for SO MANY reasons! The main one being that you can get around the $6.49 shipping on everything...sort of. If I find an item that I really want and it is a good price I will ALWAYS look at the other items in their shop to see if they may have something else that I want. The reason being that you can by multiple items from 1 shop for 1 shipping price, whereas if you buy 2 items from 2 different shops, you will pay for shipping on each item! This is my favorite way of saving money on Poshmark!
  4. Leave strong feedback!This goes the same with any site like this, such as Ebay. Leave strong feedback for each seller that you buy from. I had someone leave me 4 stars instead of 5 stars because "my packaging wasn't good enough". I wrapped it in tissue paper!!! It was a shirt!!
  5. "Accept" your items as soon as you receive them!!!I can't even explain how it drives me bonkers when I ship an item to someone and the tracking says they have received it, but they haven't "accepted" the item. What I mean by that is there is this feature to Poshmark that is made to protect the buyer. It will not release the money for the item to the seller until you click on "Accept item" meaning that you have received it and it is in the condition stated in the listing. I under stand waiting a day...or even two. But when you have obviously received it and it has been 3 days...really? But lucky for us sellers, Poshmark has made a feature to cover us. If the item has tracked as delivered to the address and the buyer hasn't released funds after 3 full days, they release the funds to you on the 4th day. I personally "accept" items the day they arrive at my home.

And this concludes my tips and tricks for using Poshmark to get the most for your money! Hope you all enjoy and please don't hesitate to comment any questions! You can Click Here to go to Poshmark.com to check it out for yourself! You can also Click Here to check out my shop!

Happy saving!


Sunday, July 9, 2017

Semi Goth Makeup Look

I was heading out to a Goth Night event and ended up with a migraine after getting all done up to go out! So I thought I'd share the makeup look that I did with you all! Here's some of the pictures that I took! I was also playing around with taking different pictures at different angles as well! Enjoy!


Thursday, June 29, 2017

Video Review on the Tarte Amazonian Clay Foundation


I just posted a Youtube video wear test and review on the Tarte Amazonian Clay foundation on oily skin! Check it out at: https://youtu.be/2izbbGutLUg

I know a lot of the beauty gurus rave about this foundation but I just could not get on the band wagon with it. See my full thoughts in the video!

Saturday, June 10, 2017

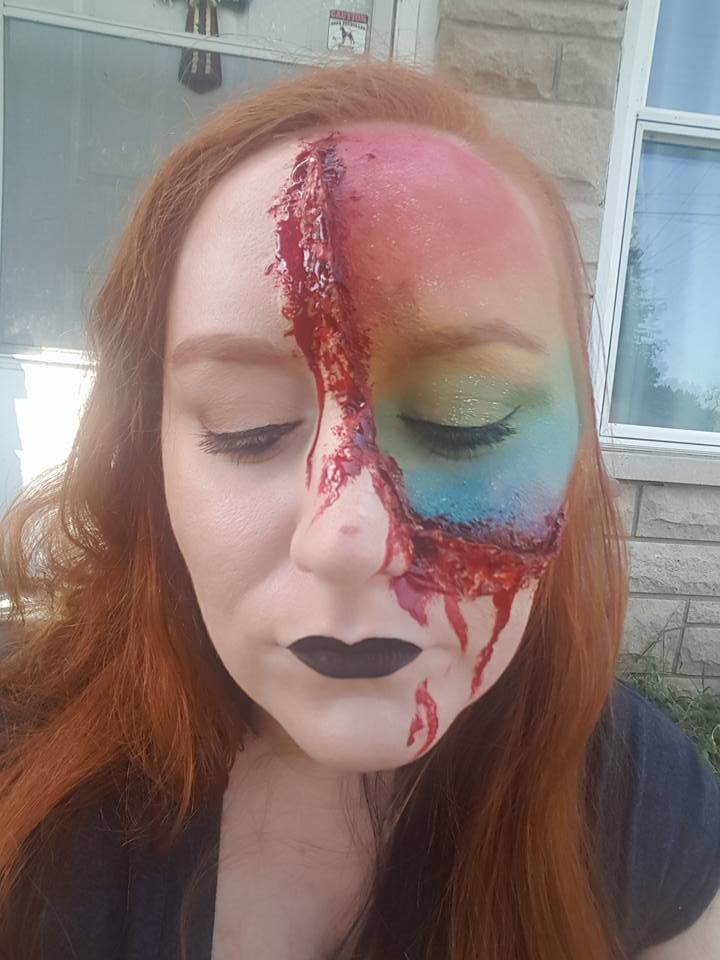
Rainbow Gore Makeup


I wanted to do a makeup look in honor of the struggles that people in the LGBT community go through since June is Pride month. I have also been craving doing some good gore makeup as well. So here is the idea that I came up with!

It took me about 2 hours to do but I am very pleased with the results. It turned out just like I wanted it to. 

If you all would like a Youtube video tutorial on this then comment below. And be sure to follow using your email so you get updates when I post new blogs! You can do that on the right hand bar of this page. Here are some more pictures from the look. Have a beautiful day and happy Pride!


Tuesday, June 6, 2017

Review on the Wet n Wild Photofocus foundation!

Yesterday I posted a new Youtube video! It is a review and wear test on the new Wet n Wild Photofocus foundation! I was pleasantly surprised by the quality of photos that I got from it, but had different feelings on how it looked in person. Check it out at the link below to see my thoughts and how it looked!

https://youtu.be/UGy8qgixhGI

Hope you enjoy this tutorial and feel free to comment on the video or on this blog with any comments/questions/concerns/suggestions! Have a beautiful day!

Saturday, June 3, 2017

Champagne Smokey Eye Tutorial

Today I posted an Eye Tutorial on Youtube. I absolutely love this look! The star of the show is the Naked Cosmetics Eye Pigment in Desert Sunset 02. You can purchase this pigment through the link in the right hand bar of this page. This is an affiliate code that I do make commission off of. Feel free to purchase from somewhere else if you do not feel comfortable using an affiliate code! Here is a link to the Youtube Video:


Hope you enjoy this tutorial and feel free to comment on the video or on this blog with any comments/questions/concerns/suggestions! Have a beautiful day!


Wednesday, May 17, 2017

May Ipsy Bag


Just got my May Ipsy bag in today and couldn't wait to open it and do a review for you all!

First of all it came in this bag this month. I am not a fan of the bag this time around. It is cute but it is not my style and it feels like a very cheap plastic to me. My daughter is excited though because when I don't like my Ipsy bags she gets them.

The first thing that I pull out is this Global Beauty Care charcoal mask. It says that it is a 15 minute facial therapy deep cleansing mud based formula that unclogs pores and lifts away impurities and is for all skin types. I'll do a first impression/review on this item when I get to try it out.


The next item that I find is the Island Life eye shadow palette from Pacifica. It is a natural mineral eye shadow that is 100% vegan and cruelty free. It has 5 neutral shades and all shades are shimmer, no matte. 

I finger swatched the shades on my hand and find that the 3 lightest shades have almost no pigment at all. This palette will be going to my mom who has very little makeup 

experience so it will be good for her to play around with.


There is also a brush in this bag. It is by the brand Royal & Langnickel and it is the Precision Angled brush. This brush is super soft, it reminds me of the IT Cosmetics brushes because they are some of the softest brushes I have ever felt. This brush would be perfect for contouring the nose.


The fourth item is a matte lipstick by the brand tre'Stique in the shade Tuscan Wine. It is a beautiful berry shade. 


It is not long lasting or smudge free. It is the definition of a matte lipstick.


The last item int his bag is the Urban Decay Afterglow 8 hour powder highlighter in the shade Sin. I love the brand Urban Decay, I have several of their products. I haven't heard anyone talk
about their highlighters though. I finger swatched it and got almost no color payoff. It reminded me more of a shimmer eye shadow than a highlighter.


Overall I am less pleased with this Ipsy bag than I have ever been. Hopefully next month will be better.  If you would like to sign up for the monthly Ipsy bags you can do so through this link and I will get a bonus 250 points towards the rewards program! If you enjoyed this review please do me a favor and follow using e-mail notifications for when I release new blogs! You can do that by using the link on the right hand side of the page. Thanks and have a beautiful day!

Friday, May 5, 2017

Purple Eye Look


Today I am doing a tutorial on this purple eye look. Without further adieu, here we go!


I am starting with my face makeup on and nothing else. And I am starting out on the right foot with an upside down picture of my eye primer that I used! I use the Urban Decay Primer Potion. I also dust a little RCMA No Color Powder over top to make the eye shadows blend over top easier.


Then I curl my lashes. 


I started out with this shade in the Morphe 35O palette and this SLMissGlam L34 Blend Beauty brush.


Now I am going to use this shade as a transition shade and blend this into the crease using small circles and windshield wiping motions.


Now I am going in with this shade of the same palette and this Wet n Wild brush.


Now I am taking this just in the
outer third to give it some depth.


Now I am taking this pinkish purple
shade in the Morphe 35B palette and this ELF Eyeshadow "C" brush.


I packed this shade onto the lid until I had the color payoff
that I was looking for to set and under tone for the top shade.


Now with the same brush I am taking
this medium purple shade from the same palette and packing on the outer half of the eye.


Now I am taking the dark purple shade directly below that with this Vera Mona brush and applying it to the outer third of the eyelid.


Using the same brush and L'Oreal
Infallible Eye Shadow pressed pigment in shade Purple Priority I first attempted to apply it by spraying my brush with some setting spray but I couldn't get it to apply across the lid, it just clumped up in one spot.


I then used my finger to apply the shadow and it applied much better this way.


I then took my favorite water line eye liner, the Maybelline Eyestudio using the brush that comes with it. I feel like when other people show a picture lining their water line they look so much more graceful than me.


And today I am trying out a new eye

liner. This is the Absolute New York Nano Liner.


And our wings are on!


I then took this shade in the Morphe

35O palette to highlight my inner corners.


I did step outside of my normal holy grail mascara and used my old favorite, the Too Faced Better Than Sex mascara. This is one eye done and one eye not.


I'll even let you in on a little trick of mine. To keep my mascara from bleeding throughout the day. I dust a little RCMA No Color Powder with a fluffy brush under my bottom eyelashes!


And here I am deciding what color lips to do with this look.


I decided on using the NYX
retractable lip liner in shade Sand Beige to line and fill in my lips.


And then I used the NYX Soft Matte Lip

Cream in shade San Paulo.


And here is the finished look! I absolutely look these colors with my blue eyes!  Thanks for watching this tutorial and if you enjoyed this please do me a favor and subscribe to e-mail notifications for when I release new blogs! You can do that from the link on the right hand side of the page. Please comment with any thoughts or suggestions or if you would like to see more blogs like this one! Thanks and have a beautiful day!